


Built For
Instruments: Options
Trading Style: Day Trading
Strategy Overview
Gala’s strategy is a simple price-action framework built around three main ideas: trend direction, important hourly levels, and the reaction price gives when it reaches those levels.
The strategy is mainly used for day trading options, although the same chart framework can also be applied to futures. Gala uses the higher timeframe to decide the direction he wants to trade, then waits for price to reach a pre-marked level before looking for confirmation on the lower timeframe.
The strategy does not attempt to predict every market move. Gala prepares several possible scenarios before the market opens and waits to see whether the market delivers one of them. If no valid setup appears, he does not force a trade.
The strategy revolves around three primary setups:
- Breaking retest
- Bounce
- Rejection
Although each setup looks different, they all follow the same principle. Price should react at a meaningful hourly level before continuing in the direction of the larger trend. By entering close to these areas, the strategy keeps risk small while aiming for consistent returns of approximately 1.5R to 2R or more.
Strategy Rules
1. Identify the Higher-Timeframe Trend
Every trading day begins with the one-hour chart. This timeframe is only used to determine the overall direction of the market, not to find entries.
Trend is identified by reading market structure rather than drawing trendlines. A series of higher highs and higher lows signals an uptrend, while lower highs and lower lows indicate a downtrend.
The structure does not need to be perfect. Small pullbacks or periods of consolidation are acceptable as long as the overall direction remains clear. If the trend becomes difficult to identify, the chart is usually removed from the watchlist.
The higher timeframe simply answers one question:
- Uptrend: Focus on call options.
- Downtrend: Focus on put options.
Keeping this directional bias prevents constantly switching between bullish and bearish ideas throughout the trading session.
2. Marking the Hourly Levels
Once the trend has been established, the next step is identifying the levels that matter most.
The strategy focuses on significant hourly pivot points where price previously reversed or reacted with strong momentum. These areas often become future support or resistance.
Rather than marking every swing high and low, only the most meaningful levels are kept on the chart. Clean levels generally produce cleaner reactions.
When drawing these areas, Gala often pays more attention to candle bodies and opening prices than to extreme wick highs or lows. The opening price of a strong impulsive candle can represent the point where buyers or sellers first took control, making it a valuable reference level.
Not every level carries the same weight. Some provide stronger reactions than others, so each one is judged based on the quality of the previous move.
High-confidence levels usually have:
- A strong rejection or breakout.
- A clear hourly pivot.
- Limited previous testing.
- Clean price structure.
If price repeatedly trades through a level without producing a meaningful reaction, that level gradually loses its importance and may be removed from the chart.
3. Building the Pre-Market Plan
Preparation is one of the most important parts of the strategy.
After identifying the trend and marking the important levels, a trading plan is created before the opening bell. The goal is to know exactly what needs to happen before a trade is even considered.
Each plan includes:
- The stock being watched.
- The important hourly level.
- The trade direction.
- The setup required for entry.
For example, the plan may be:
- Tesla calls after a break and retest of resistance.
- Palantir calls after a bounce from hourly support.
- Tesla puts after a rejection from hourly resistance.
These are not automatic trade signals. They are simply prepared scenarios.
Once the market opens, price must still reach the planned level and produce the correct lower-timeframe confirmation before an entry is taken.
Only a small watchlist is created each morning. Even if ten or more stocks are reviewed, only the cleanest charts remain. If the structure looks messy, overly volatile or difficult to understand, it is simply ignored.
Economic news is also reviewed before the session begins. Major events such as inflation reports, Federal Reserve announcements or important economic releases can create abnormal volatility and influence how aggressively trades are managed.
4. Timeframes Used
Each timeframe has a specific purpose within the strategy.
1-Hour Chart
- Determine the trend.
- Mark key support and resistance.
- Build the pre-market plan.
5-Minute Chart
- Primary confirmation timeframe.
- Wait for one of the three setups to develop.
- Execute trades.
2-Minute Chart
- Fine-tune entries.
- Improve timing.
- Confirm momentum.
Although the two-minute chart provides earlier information, the five-minute chart carries more weight. If the two-minute chart looks bullish while the five-minute chart still looks weak, patience is preferred until both timeframes agree.
This reduces false signals and improves the overall quality of each entry.
5. Waiting After the Market Opens
Gala normally avoids trading during the first five minutes after the market opens.
The opening candle often contains extreme volatility, large wicks and aggressive movement in both directions. Earlier in his career, he made mistakes by entering during this unstable period.
He initially avoided the first 30 minutes, then reduced that to 15 minutes, then 10 minutes, and eventually settled on waiting for the first five-minute candle to close.
There may be situations where a two-minute setup appears before the first five-minute candle closes, but Gala generally prefers to wait. Missing a trade is better than entering during unstable opening volatility.
After the first five-minute candle closes, he begins comparing the market action with his prepared plans.
Some plans may be immediately invalidated. Others may remain active. His job is not to create a new trade on the spot but to identify which prepared setup is still valid.
Strategy Setups
Primary Setup 1: Breaking Retest
Setup Overview
The breaking retest is one of the highest-quality setups in the strategy. Instead of chasing a breakout, the goal is to wait for price to break an important hourly level, return to test it, and then continue in the direction of the trend.
For a bullish trade, the market should already be in an hourly uptrend. Price then breaks above a key resistance level and closes above it with strength. Rather than buying immediately, the strategy waits for price to pull back toward that same level. If the old resistance now acts as support, it confirms that buyers are still in control and creates a much better entry.
The bearish version follows the same idea in reverse. Price breaks below an important support level, retests it from underneath, and then continues lower after the level holds as resistance.
The objective is to enter as close to the level as possible instead of chasing the move after it has already traveled a long distance.
Entry
The best entries happen near the retest level after the market shows that the breakout is holding.
A good retest usually has these characteristics:
- Price breaks the hourly level.
- A five-minute candle closes beyond the level.
- Price pulls back to test the area.
- The candle leaves a small wick through the level but closes back on the correct side.
This reaction shows that the market attempted to move back through the level but failed. That failure often leads to the next move in the direction of the trend.
If price never returns to the level and simply continues higher or lower, the trade is usually skipped. Gala would rather miss a trade than chase one with poor risk-to-reward.
Stop-Loss
The stop-loss is placed beyond the retest structure because that is where the setup becomes invalid.
- For bullish trades, the stop normally goes below the lowest retest wick.
- For bearish trades, the stop is placed above the highest retest wick.
This allows normal market movement while protecting the trade if buyers or sellers lose control of the level.
If several retest candles form around the same area, the stop is generally placed beyond the most extreme wick.
Target
The initial target is usually between 1.5R and 2R.
If the next hourly level is much further away, most of the position can be closed around the first target while leaving a small runner to capture additional profit.
Primary Setup 2: The Bounce
Setup Overview
The bounce setup is designed to trade pullbacks within an existing trend.
Instead of waiting for price to break a level, the strategy looks for price to retrace into an important hourly support level during an uptrend. The expectation is that buyers will defend the area and continue the larger trend.
Rather than reacting to one reversal candle, the setup becomes stronger when several candles interact with the level.
The best bounce usually shows:
- Multiple candles testing support.
- Candle bodies holding above the level.
- Small wicks moving below support before closing back above it.
Repeated failures below support suggest that sellers are losing momentum while buyers continue defending the same area.
Entry
The entry should be taken once price has clearly respected the support level.
Buying immediately after a large move away from support usually creates poor trade location. Waiting for price to react at the level keeps the stop smaller and improves the overall reward-to-risk ratio.
Sometimes one rejection candle is enough, but in many cases two or three candles holding the level provide stronger confirmation.
Stop-Loss
The stop is placed slightly below the lowest wick created during the bounce.
That wick represents the point where sellers pushed the market before buyers stepped back in.
If the stop becomes too large relative to the expected reward, position size should be reduced or the trade should be skipped.
Target
The first target is normally around 1.5R to 2R.
The next hourly resistance level can also be used as a profit target.
If there is plenty of room before the next resistance, most of the position can be closed at the initial target while a small runner remains open.
Primary Setup 3: The Rejection
Setup Overview
The rejection setup is the bearish version of the bounce.
It is most commonly traded during an hourly downtrend when price rallies back into an important resistance level.
Instead of buyers successfully breaking above resistance, the market repeatedly fails to hold above the level.
Strong rejection candles usually have bodies below resistance while leaving wicks above it.
This tells us that buyers briefly pushed price higher but were unable to maintain control. Sellers absorbed the buying pressure and forced price back below resistance.
Once buyers begin losing momentum, the next move lower often follows.
Entry
The entry should be taken as close to the resistance level as possible after confirmation appears.
Entering too far below the level creates unnecessary risk because the stop still needs to remain above resistance while the available downside becomes smaller.
A better entry creates a tighter stop and improves the potential reward.
Stop-Loss
The stop-loss is placed just above the highest rejection wick.
If several candles reject the same resistance area, the highest point of those attempts becomes the invalidation level.
If price trades above that area, the rejection has failed and the original idea is no longer valid.
Target
Like the other setups, the first objective is normally 1.5R to 2R.
The next hourly support level can be used as a secondary target, with a small runner left open if momentum remains strong.
Trend Continuation
Although the strategy includes three different setups, they all follow the same idea: trading with the existing trend.
The breaking retest, bounce and rejection are simply different ways to join the next leg of the move.
- In an uptrend, the objective is to trade from a higher low toward a higher high.
- In a downtrend, the objective is to trade from a lower high toward a lower low.
The one-hour chart provides the overall direction, while the two-minute and five-minute charts are used to find the entry.
Instead of predicting where the market will go next, the strategy waits for price to confirm that the trend is continuing before committing capital.
Market Alignment and Relative Strength
The overall market is an important confirmation factor.
When Gala is looking for calls, he prefers the major indices to be stable or moving upward. When he is looking for puts, he prefers the indices to be weak.
He generally avoids entering a long position while the market is aggressively selling off.
However, if a stock remains strong while the indices move lower, that can indicate relative strength.
During the live Tesla trade, the indices were initially moving down while Tesla remained green and continued holding its level. Gala viewed this relative strength as a positive factor.
Relative strength does not replace the setup. The hourly trend, level and lower-timeframe reaction still need to be present.
It simply increases confidence that the stock may continue in the intended direction when the market stabilizes or reverses.
Using Bookmap
Bookmap is used as a secondary confirmation tool rather than the foundation of the strategy. The trade should already make sense based on the hourly trend, key levels and price action before Bookmap is even considered.
It is mainly used when trading SPY, QQQ, ES and NQ. Individual stocks, such as Tesla, are usually traded without relying on Bookmap.
The main objective is to identify large areas of resting liquidity that line up with the pre-marked hourly levels. When both forms of analysis point to the same area, confidence in the setup increases.
For example, if an hourly resistance level also has a large wall of sell orders on Bookmap, that level may become a stronger area for a rejection trade. Likewise, a large group of buy orders sitting near hourly support can add confidence to a bounce setup.
Bookmap should be viewed as an extra confirmation rather than a reason to enter a trade. If the price action does not meet the rules of the strategy, Bookmap alone is not enough to justify an entry.
Options Contract Selection
The strategy is primarily traded using short-dated options.
Contract selection is based on the expected move of the underlying stock rather than simply buying the cheapest option available. Most trades use strike prices that are close to the area where price is expected to move during the session.
Very short-dated contracts can move quickly, but they are also affected by time decay and changes in implied volatility. Because of this, contract selection is just as important as finding the right setup.
During one of the live Tesla examples, Gala chose Friday expiration contracts instead of the nearest expiration. Although the trade was expected to happen the same day, the extra time until expiration reduced some of the additional volatility and provided a smoother contract to trade.
Liquidity is also important. Contracts with tight bid-ask spreads are preferred because they allow entries and exits with less slippage.
Risk Management
Risk management is the foundation of the strategy. Every trade begins by defining the maximum acceptable loss before placing an order.
Instead of focusing on how much money can be made, the first question is how much can comfortably be lost if the setup fails.
Options can move very quickly, so the exact percentage loss may vary depending on volatility and execution. A stop intended to lose 5% may end up losing slightly more if the market moves aggressively. For that reason, position size is adjusted so the total dollar risk always remains within acceptable limits.
One of Gala’s core principles is simple: if losing the planned amount feels uncomfortable, the position is too large.
Reducing size is always better than forcing a trade with more risk than can be handled emotionally. Consistent execution becomes much easier when the outcome of any single trade does not affect decision-making.
Position Sizing
Position size changes depending on the quality of the opportunity. Not every setup deserves the same amount of capital.
Several factors influence size, including:
- Confidence in the hourly level.
- Quality of the setup.
- Distance to the stop-loss.
- Whether the trade was planned before the open.
- Current market conditions.
- Confidence and emotional state.
High-quality setups that match the pre-market plan may justify a full position.
If a trade was not planned, the level is less reliable or market conditions are uncertain, position size is reduced.
During the recorded Tesla trade, Gala traded a much smaller position than usual because he was away from his normal trading setup. Even though the trade met all the rules, the unfamiliar environment increased execution risk, so reducing size helped manage that additional uncertainty.
Reward-to-Risk Objective
The strategy focuses on consistency rather than trying to catch every large move.
Most trades aim for approximately 1.5R to 2R. Those targets may seem small compared to traders looking for 5R or 10R winners, but consistently capturing quality trades can produce much more stable long-term results.
Anything beyond 2R is considered a bonus rather than an expectation.
By keeping expectations realistic, there is less pressure to hold every position for an unrealistic move. Consistency always takes priority over chasing the biggest possible winner.
Trade Management
Managing the trade is just as important as finding the entry.
As price moves in the intended direction, part of the position is gradually closed to lock in profits while the remainder is allowed to continue if momentum stays strong.
The amount taken off depends on the quality of the move. On a normal trade, around half of the position may be closed near the first target. If momentum remains strong, a larger portion can be left open. If conditions become uncertain, profits may be taken more aggressively.
The stop-loss is also adjusted as the trade develops. Instead of leaving it in its original location, it is gradually moved behind new areas of market structure. This protects profits while still giving the trade enough room to continue.
The goal is to eventually reach a point where the remaining position can no longer turn the trade into a loss.
Reading Momentum
Momentum helps determine how aggressively the position should be managed.
Strong momentum is often seen through consecutive candles moving in the same direction with very little pullback.
In a long trade, several strong bullish candles suggest buyers remain in control. In a short trade, consecutive bearish candles indicate continued selling pressure.
As momentum begins to slow, candles become smaller, larger wicks appear or price starts rejecting the next level. These changes are signs to become more defensive by taking additional profits or tightening the stop.
Moving the Stop
Stops should move with the trade rather than remaining fixed for the entire position.
As new five-minute candles form, the stop can be moved behind recent swing highs or swing lows, depending on the direction of the trade.
The stop should not be placed so close that normal price movement immediately triggers an exit. At the same time, it should continue protecting profits as the trade develops.
Eventually, the stop may be moved beyond the original entry price. Once that happens, the remaining position can no longer lose money even if price reverses.
Using Runners
After taking partial profits, a small portion of the position may remain open as a runner.
The purpose of the runner is to participate in larger-than-expected moves without risking the profits that have already been secured.
Typically, only a small percentage of the original position remains open while the majority has already been closed.
Gala also mentions that holding runners can be psychologically difficult. Sometimes they are closed early simply to protect profits, even if the technical setup still looks healthy.
Missing part of an extended move is considered acceptable if it helps maintain consistency and emotional control.
Trade Frequency and Re-Entries
The strategy is built around quality rather than quantity.
Most trading days consist of only two or three trades. Taking significantly more trades usually means discipline has started to disappear and lower-quality setups are being forced.
If the first entry is stopped out but the setup still looks valid, one additional attempt is allowed.
For example, the first retest may fail, but the next few candles could build a stronger structure around the same level. In that situation, a second entry is acceptable.
However, the strategy does not allow a third attempt on the same setup. After two failed entries, it is assumed that the market is not behaving as expected, and attention should shift to the next opportunity.
Planned vs. Unplanned Trades
Most trades should come directly from the pre-market plan.
Preparing scenarios before the market opens removes much of the emotion involved in decision-making. When price reaches a planned level and produces the expected confirmation, execution becomes much easier.
Occasionally, the market creates a new opportunity that was not part of the original plan. These trades can still be taken if the setup is very clear, but position size is usually reduced.
Smaller size helps manage the additional uncertainty that comes with trading an unplanned idea.
The same approach applies when changing from calls to puts, or vice versa. Unless there is a major shift in market conditions, the original plan should generally be followed.
The Importance of Entry Quality
A good entry can make the difference between an average trade and an excellent one.
Two traders may identify the exact same setup, but the trader who enters closer to the key level will usually have a smaller stop and a better reward-to-risk ratio.
Chasing price after it has already moved away from the level often leads to unnecessary risk and lower-quality trades.
For that reason, patience is one of the most important skills within the strategy.
If the ideal entry is missed, it is usually better to let the trade go rather than force a poor entry.
Hiding Profit and Loss
During an active trade, the focus should remain on the chart rather than the running profit or loss.
Watching P&L can cause emotional decisions. Traders may take profits too early because they like the dollar amount on the screen or refuse to close a losing trade because they do not want to accept the loss.
To avoid those emotions, Gala prefers hiding the running P&L while managing a position.
This keeps attention on price action, market structure and the trading plan instead of the money being made or lost.
Day Trading Means Closing the Trade
Every trade is planned as a day trade and should be managed that way.
If the setup fails, the position should be closed rather than held overnight in the hope that the market eventually recovers.
Holding a losing options trade simply because there is still time until expiration changes the original idea completely.
Time decay and implied volatility can continue working against the position even when the stock barely moves.
Once the setup is no longer valid, the trade should be closed and the next opportunity should be waited for.
One-and-Done Trading
Not every trading day needs multiple positions.
After a well-executed winner, Gala is often comfortable ending the session and protecting the profits already made.
Continuing to trade simply because the market is still open increases the chance of giving back gains through unnecessary trades.
One high-quality trade is often enough if it follows the plan and is managed correctly.
Journaling and Review
The trading session does not end after the final position is closed.
Reviewing trades is an important part of improving consistency and identifying areas that need work.
Each trade should be recorded while the details are still fresh. Along with the basic trade information, notes should also include what went well, what could have been improved and whether every rule was followed.
A good journal normally records:
- Entry and exit.
- Stop-loss.
- Profit target.
- Position size.
- Partial exits.
- Setup type.
- Whether the trade was planned.
- Mistakes made.
- Emotional state.
- Overall trade rating.
One of the most important lessons from Gala’s approach is that a profitable trade is not always a good trade, and a losing trade is not always a bad one.
If every rule was followed and the setup was valid, a losing trade can still be considered successful because the process was executed correctly. Over time, consistently following the process is what produces long-term results.
Trade Breakdown
Trade Example: Tesla Call Trade
Market Context
Before the market opened, the plan for Tesla was to look for put options if price rejected the 424 resistance level. That rejection never happened. Price approached the level but failed to reach it, so the original setup was never triggered.
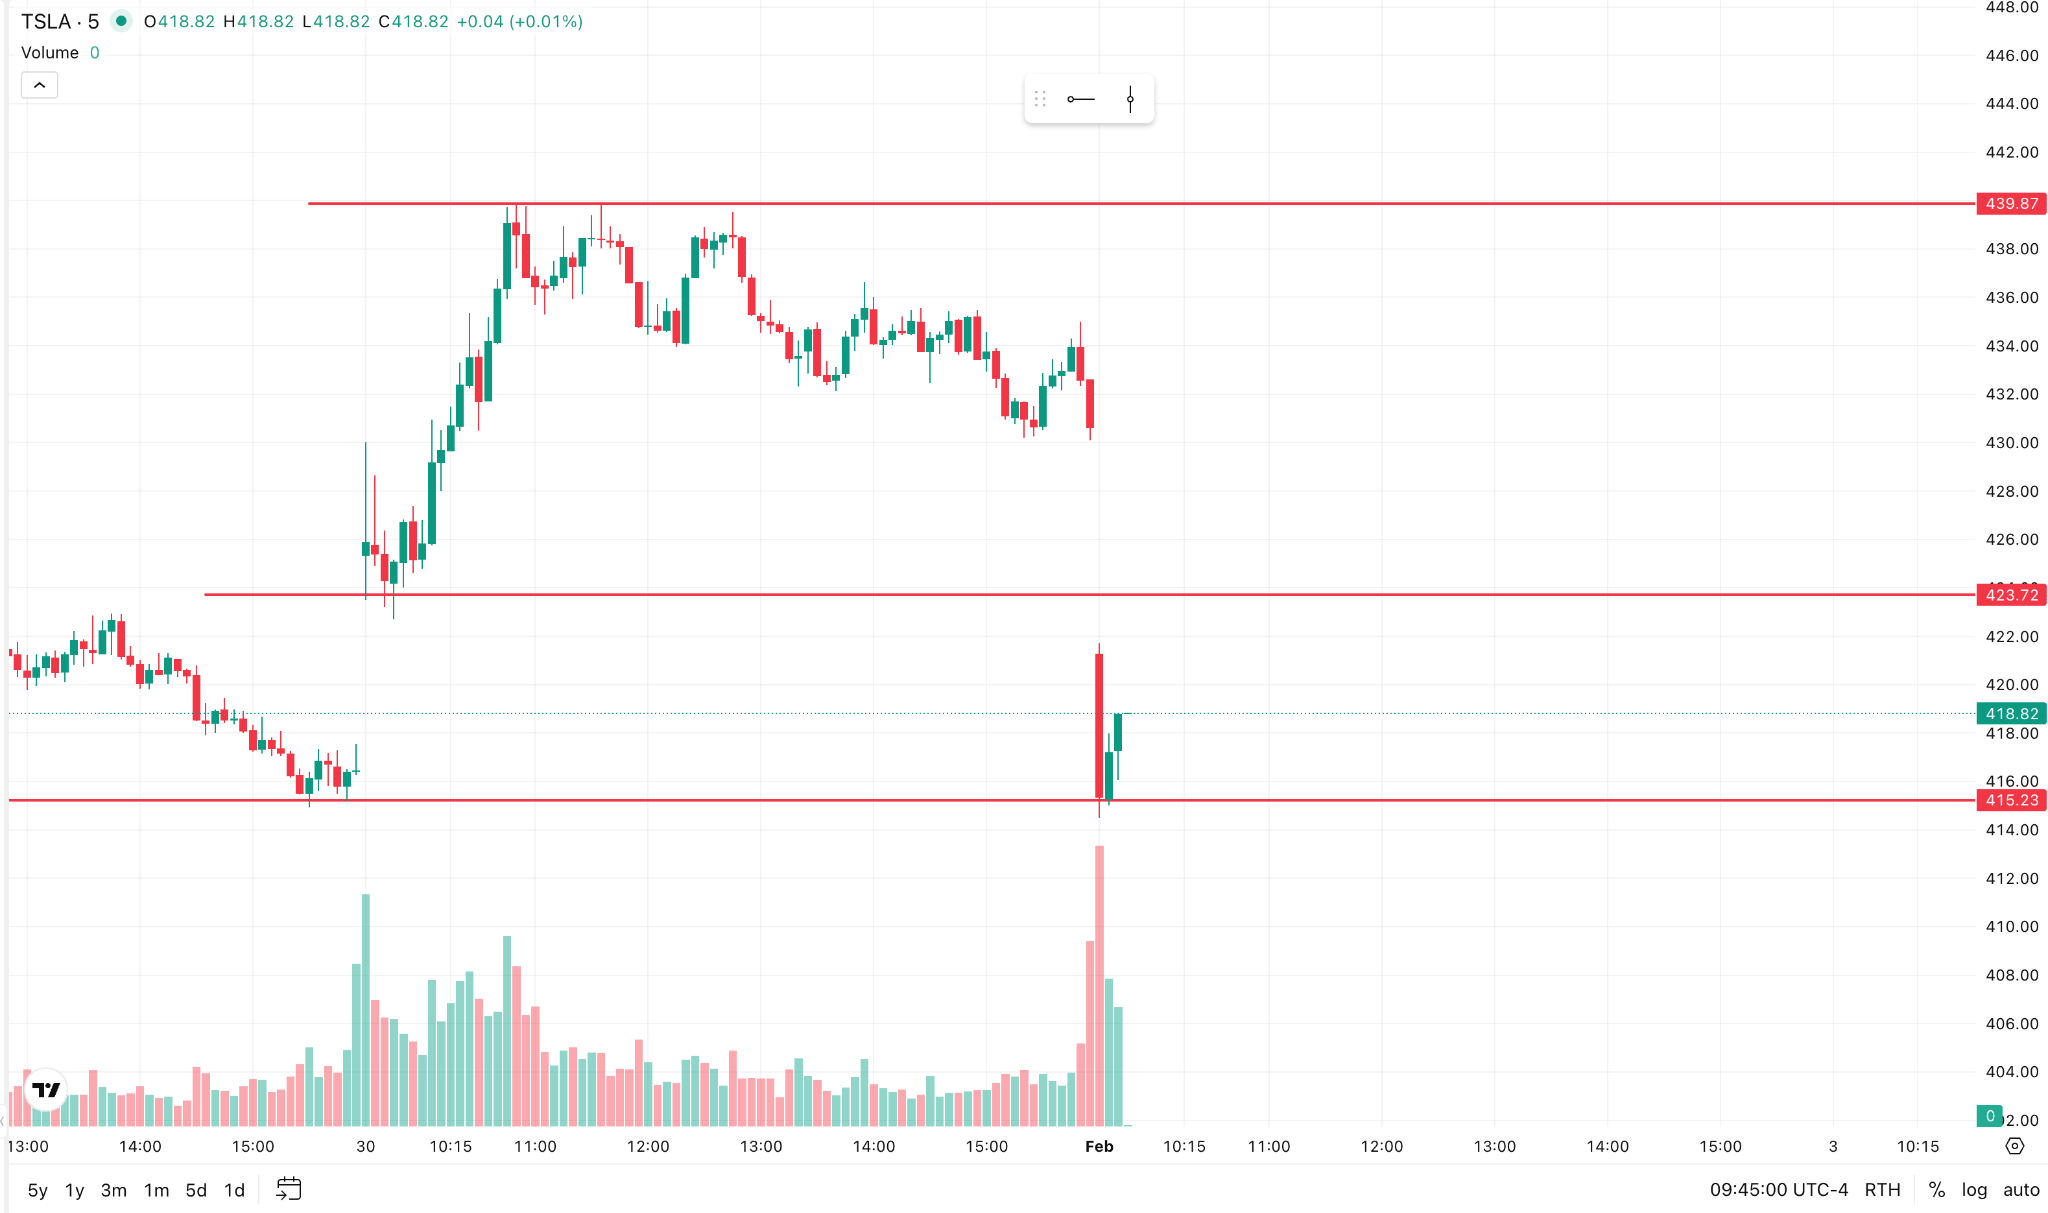
As the session developed, attention shifted to another hourly level that had already produced two strong reactions earlier in the day. When price returned to that support area, buyers defended it once again, creating an unexpected long opportunity.
Although this setup was not part of the original pre-market plan, the level had shown enough significance for Gala to consider taking the trade. Because it was an unplanned setup, the position size was reduced to keep the overall risk under control.
Entry
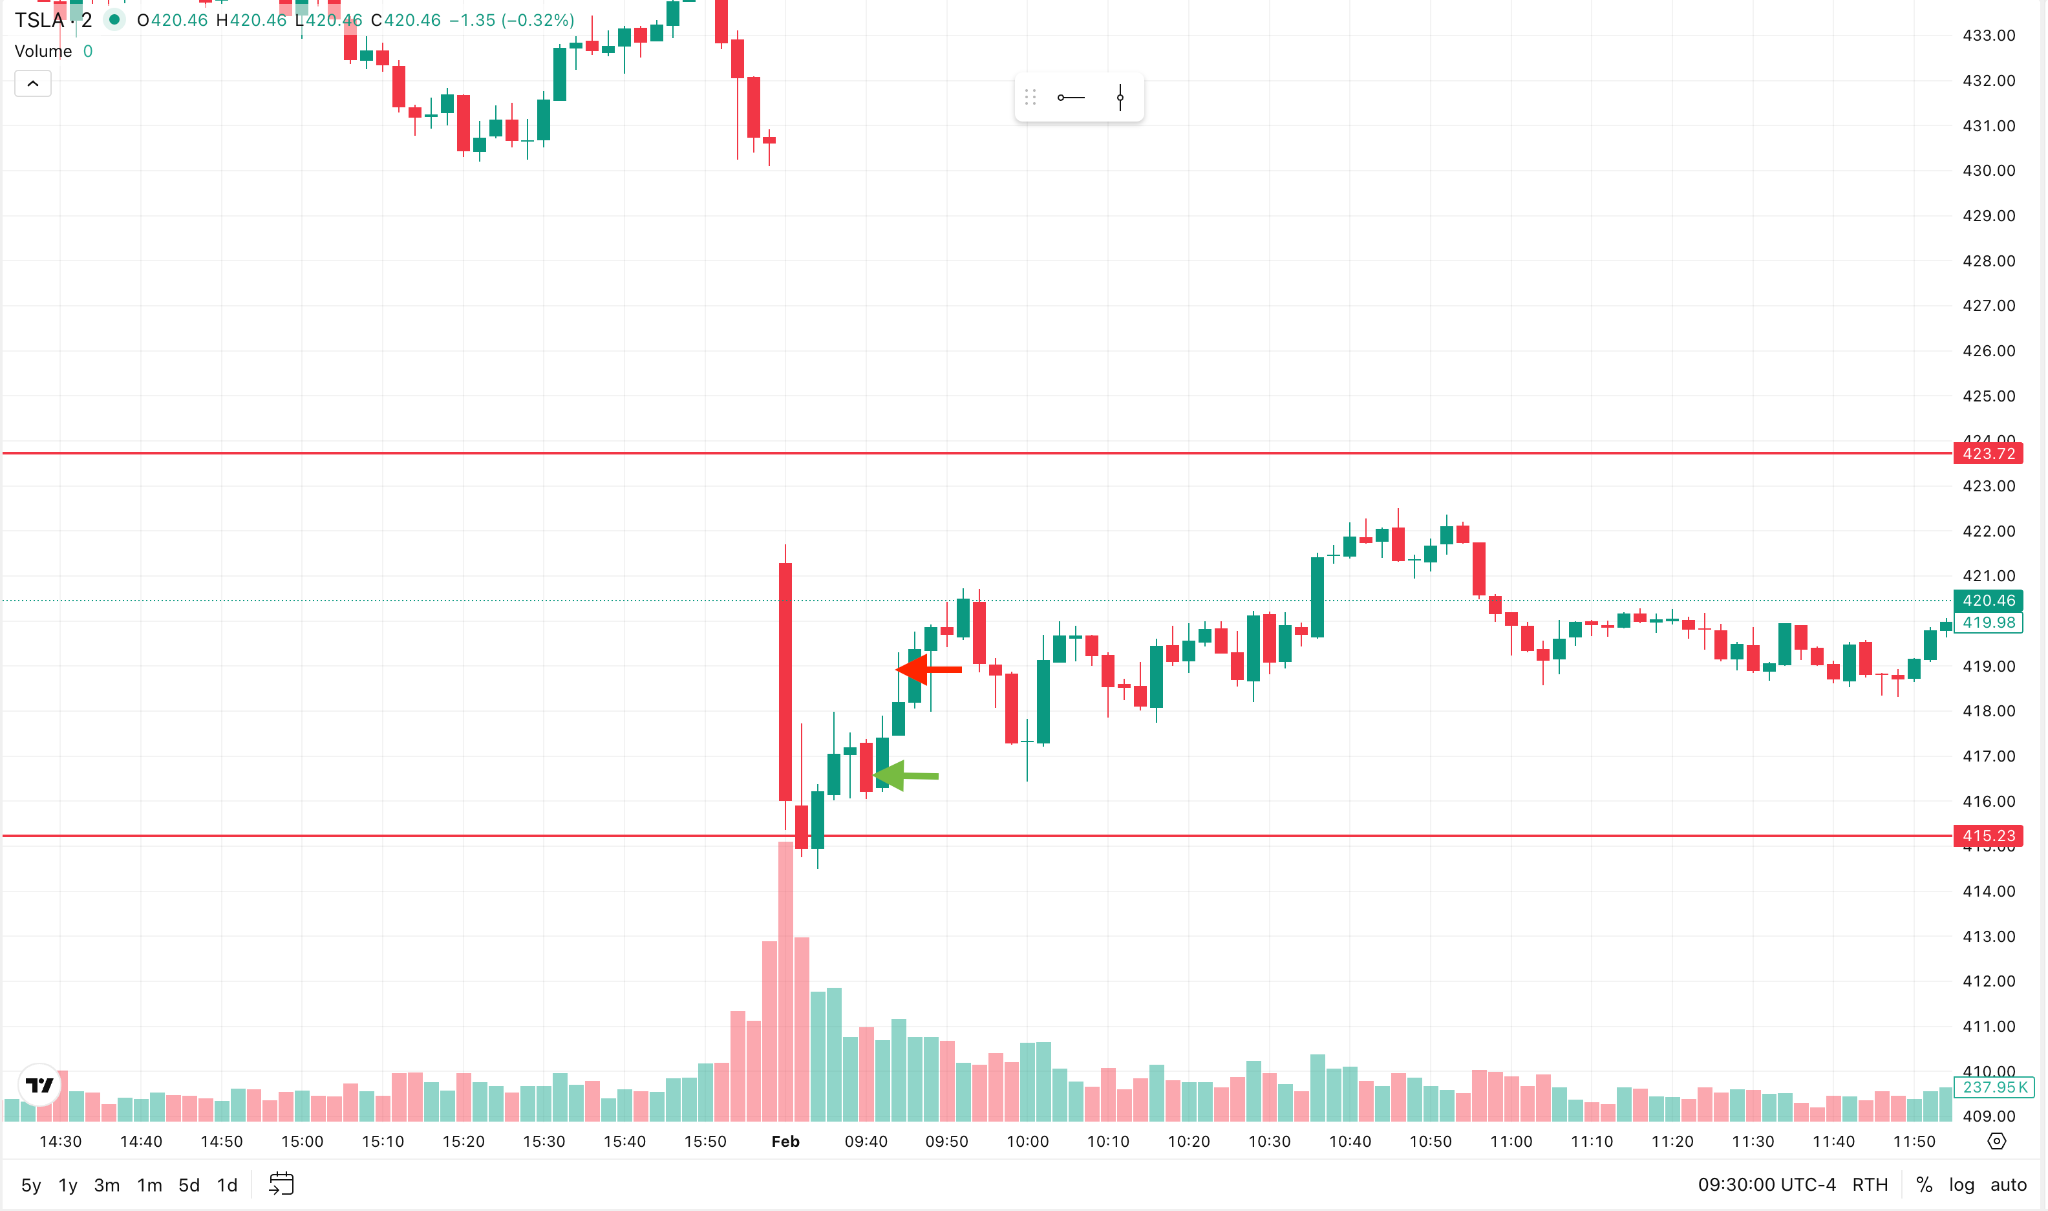
A call option was entered after price reacted from the support level. While the trade followed the strategy’s rules, the entry was not taken as close to the level as intended.
Looking back, Gala explained that the ideal entry would have been directly at the support level instead of slightly above it. Entering closer to the level would have improved the reward-to-risk ratio and reduced the required stop distance.
Trade Management
The initial risk on the trade was approximately $2,400, with a planned target of around $4,800, giving the trade a 2R objective.
The position ultimately produced a little over $5,000, slightly exceeding the original target. Even though the trade was profitable, it was graded as only three stars because the execution did not fully follow the trading plan.
Mistakes
After reviewing the trade, Gala identified three mistakes:
- Late entry: The position was entered above the ideal support level instead of directly at it, resulting in a less efficient entry.
- Not in the plan: The original idea was to look for puts, but the trade shifted to calls after a new support level formed. Although the level was strong enough to justify the trade, it was still outside the pre-market plan, so a smaller position size was used.
- Exited too early: The full position was closed after reaching the target instead of leaving a small runner. Price continued moving higher, and keeping a small portion of the trade open could have captured additional gains.