


Built For
Instruments: Options/Futures
Trading Style: Day Trading/Swing Trading
Strategy Overview
The Volume Profile Strategy is a structured, repeatable approach built on the principle that price reacts differently depending on how much volume has been transacted at each price level. Instead of focusing on volume over time (like traditional volume bars), this strategy analyzes volume at price to reveal where market participants are positioned.
The two key behaviors:
- High-Value Areas (HVAs) – Price tends to consolidate where a large number of transactions have occurred. These zones are “sticky.”
- Low-Value Areas (LVAs) – Price tends to move quickly through zones with little trading activity.
By identifying volume edges (the sharp drop-off from high to low volume), traders can anticipate where the price will likely react, stall, or break away.
The method combines:
- Volume Profile (session-based & visible range)
- Auction Market Theory
- Signal candle confirmation
- Four key daily liquidity levels
- Higher timeframe directional bias
- Edge-to-edge targeting
The goal is to take high-probability trades at meaningful volume edges, confirmed by price action, while avoiding mid-zone, low-participation areas.
Strategy Rules
Volume Profile Interpretation
The Volume Profile shows how many people transacted at each price, not at each time.
- Price levels with high transaction volume are called high-value areas (HVA).
- Price levels with low transaction volume are low-value areas (LVA).
- A volume shelf is a sharp drop-off at the edge of a high-value node, which becomes a key reaction zone.
Use the Right Timeframes
Higher timeframes (Weekly, Daily) are used to identify long-term value areas and edges.
Execution timeframes: 4H and 1H are the main chart timeframes used for identifying signal candles and taking trades.
Avoid overlapping too many profiles; keep bias and execution timeframes clearly separated.
Focus on Four Key Daily Levels
These are important contextual liquidity zones:
- Overnight High
- Overnight Low
- Prior Day High
- Prior Day Low
These are liquidity zones where trapped traders are likely to act aggressively when the price returns.
Volume Edge + Signal Candle = Trade Setup
To take a trade, three elements must be present:
- Price is touching a volume profile edge (transition from HVA to LVA or vice versa).
- The location aligns with a key contextual level (ONH/ONL/PDH/PDL).
- A high volume signal candle forms with a visible wick rejecting the area and closing in the trade direction.
Always wait for the signal candle to close. Do not front-run it; even the last few minutes of a candle can change everything. A bullish candle can turn bearish right before close.
Directional Bias Comes from Higher Timeframes
- If the Weekly chart closes with a high volume bottom-wick reversal candle at a volume edge, then the bias is long.
- All intraday setups should then favor long trades, even if entries are taken on 4H, 1H, or lower timeframes.
- You don’t trade the weekly candle, but you use it to know which direction to prioritize.
Execution: Entry, Stop, Target
- Entry: After the signal candle closes at the volume edge.
- Stop: Just beyond the signal candle’s wick or beyond the edge of the high value node.
- Target: The next shelf — edge-to-edge targeting. You trade through low-volume zones and look for the next high-volume area.
Volatility-Based Retest Entry
- If the signal candle has a long wick → expect a 50–80% wick retrace before continuation.
- Set a limit order in that retrace zone (estimated visually, not with Fib tools).
- Works well for NQ and other volatile markets.
Avoid Mid-Zone Trades
- Low-volume zones are unpredictable; avoid entries in the middle.
- Wait for the price to hit an edge before trading.
Previous Day POC Retest
A core setup is the Previous Point of Control (POC) Retest. After a breakout or trend day, the price often returns to the prior day’s POC before resuming the trend.
This is a reliable entry point. Look for a signal candle at the prior day’s POC and target a new high/low.
Pros and Cons of the Strategy
This strategy is designed to deliver high-quality, repeatable setups — but like any trading strategy, there are key things to understand before using it.
Note: The cons listed here aren’t disadvantages. They are things to be aware of — important characteristics that require patience, discipline, and proper management to make the strategy work effectively.
Pros
True Auction Insight: Reveals where market participants are actually positioned, not just where price has moved.
Objective Key Levels: HVNs and LVNs provide clear, non-subjective trade zones.
Fractal Application: Can be applied from weekly down to intraday charts.
Built-in Trade Filtering: Automatically highlights no-trade zones (mid-LVNs with no structure).
Works Across Asset Classes: Effective in any market with centralized, reliable volume data.
Supports Bias Formation: Higher timeframe profiles give clear market context before looking for entries.
Cons
Fewer Trades: Quality setups at true edges are infrequent, requiring patience.
Slow to Develop: Volume Profiles need time to build; intraday edges may not be clear early in the session.
Overlap Confusion: Multiple timeframes can produce conflicting HVNs if not filtered down to 2–3 main profiles.
Requires Volume Data: Not viable in decentralized markets like spot forex.
Not “Always On”: Some days produce no valid signals; traders must be comfortable sitting out.
Chop Prediction Risk: While it can predict chop, trading inside chop zones is lower probability and riskier.
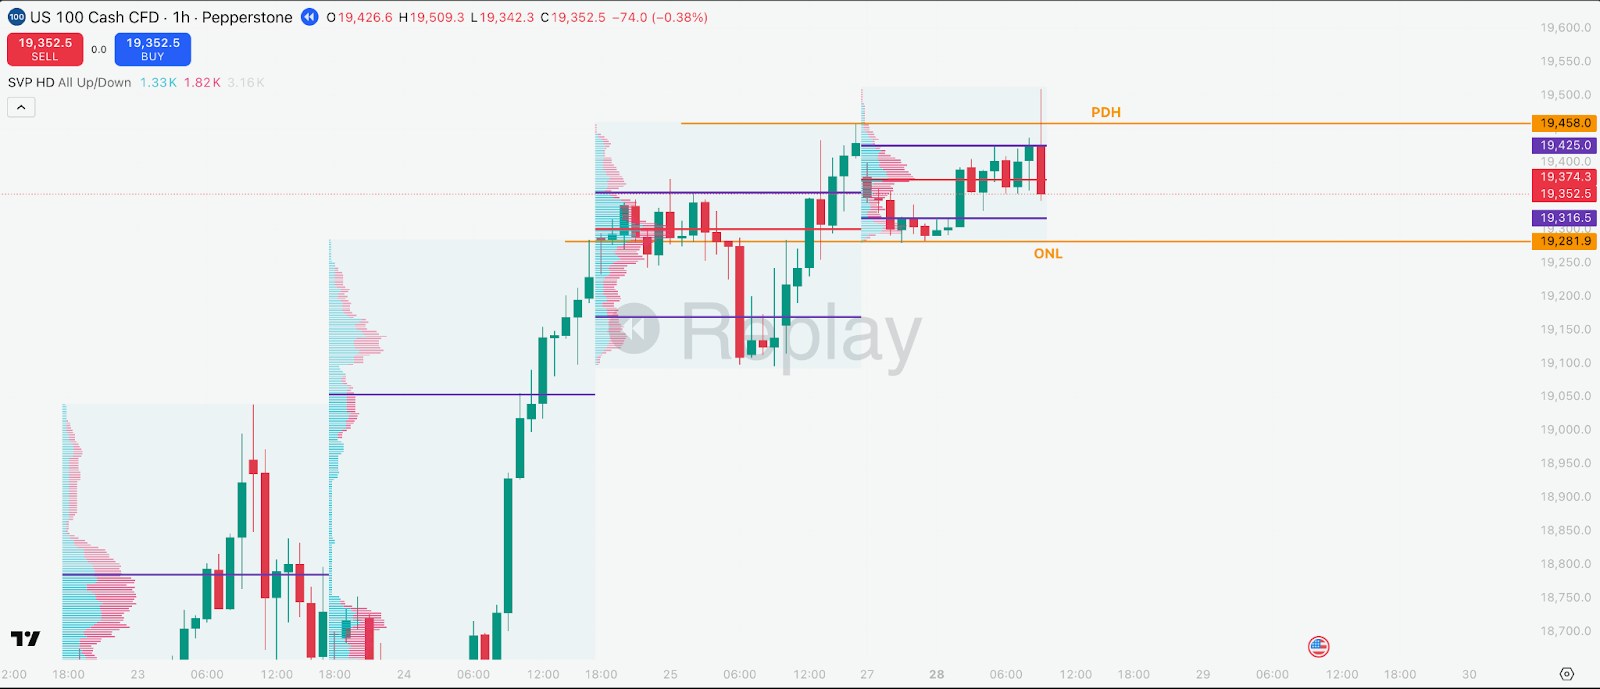
Trade Breakdown
Context
- Instrument: NQ futures
- TF: 1H
- Tools: Session Volume Profile, Visible Range VP
- Key levels: Prior Day High (PDH), Overnight Low (ONL)
Before the move
- Mark PDH and ONL.
- Session VP is building a high-volume shelf near the highs.
- Visible Range VP shows a lower shelf / support area near ONL.
Signal
Price trades up into PDH and the edge of the upper VP shelf. A 1H candle forms that:
- Trades above PDH intrabar (sweep),
- Closes back below PDH,
- Has a long upper wick and high volume.
This is the signal candle: trapped longs at a VP edge.
Execution
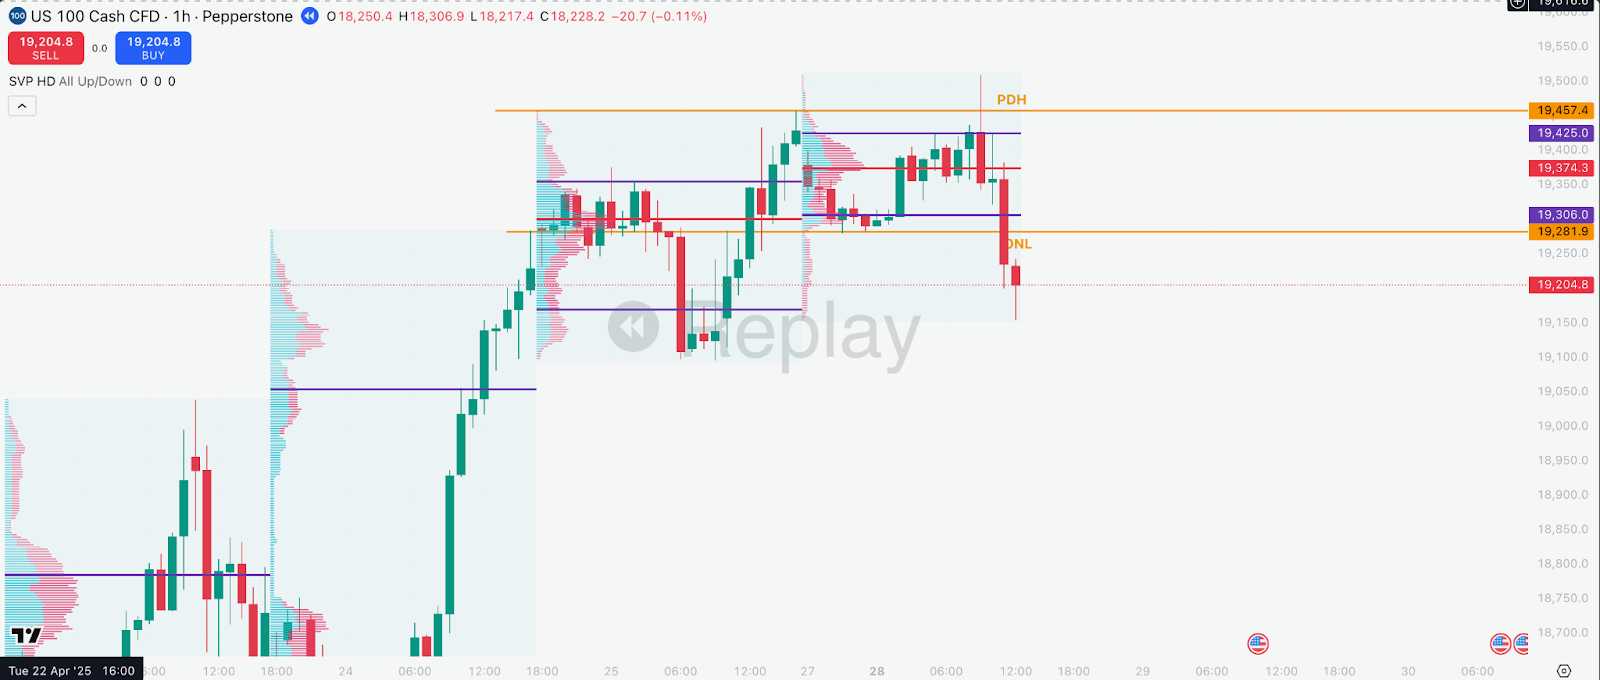
Short Entry: On the close of the 1H signal candle (or tiny retrace into its body)
Stop Loss: Just above the wick high of the signal candle (above the sweep).
Target: First target: ONL. This aligns with the lower shelf on VP / visible range.
Outcome
- Price sells off from PDH,
- Moves back through the session range,
- Tags ONL / lower shelf, where buyers step in.
- Short exits at planned target.
How to Backtest This Volume Profile Strategy
The fastest way to test this Volume Profile Strategy is with TradeZella's automated no-code backtesting. Define your rules in plain English, hit run, and TradeZella runs them across 11+ years of historical data in seconds, then shows you every individual trade along with your win rate, profit factor, and expectancy instantly, without you stepping through a single chart. It is the quickest way to see whether the setup holds up before you risk a dollar.
You can also test it manually by replaying the market bar by bar. Load 11+ years of historical data, set up your volume profile and your 4-hour and 1-hour execution charts the way you trade live, and replay sessions bar by bar. Use the weekly and daily profiles to set directional bias, mark your high-value and low-value areas and the four key levels, the overnight high and low and the prior day high and low, then wait for price to reach a volume edge that aligns with a key level and for a high-volume signal candle to close rejecting the area. Enter on that close, place your stop just beyond the wick or the edge of the high-value node, and target the next shelf for edge-to-edge moves through the low-volume zone. Use automatic position sizing and drag your stop and target directly on the chart. Every backtested trade gets logged automatically with your entry, exit, position size, and P&L. Tag setups like volume edge rejections and prior day POC retests so you can compare them, add notes, and review the same way you would a live trade. After 30 to 50 trades, you can see your win rate, profit factor, and expectancy on this specific setup. Manual replay is the best way to build screen time and a real feel for the setup.
When you start trading live, import your live trades into TradeZella, the AI trading journal that does the journaling for you. Your backtest results and live results live in the same platform, so you always know how the strategy performs in testing vs how it performs with real money, without switching between tools or maintaining separate spreadsheets.
Start Backtesting This Strategy Using TradeZella
Frequently Asked Questions
What is the Volume Profile Strategy?
The Volume Profile Strategy is a structured, repeatable approach built on the principle that price reacts differently depending on how much volume has traded at each price level. Instead of looking at volume over time, it analyzes volume at price to reveal where participants are positioned. The goal is to take high-probability trades at meaningful volume edges, confirmed by price action and aligned with key auction levels, while avoiding low-participation mid-zone areas.
What is the difference between high-value and low-value areas?
A high-value area is a price zone where a large number of transactions have occurred, so price tends to consolidate there and the zone is sticky. A low-value area is a price zone with little trading activity, so price tends to move through it quickly. Trading the strategy means anticipating that price stalls in high-value areas and travels fast through low-value areas, which is the basis for edge-to-edge targeting.
What is a volume edge, or volume shelf?
A volume edge, or volume shelf, is the sharp drop-off at the edge of a high-value node where volume transitions from high to low. These edges become key reaction zones, because price often stalls, reacts, or breaks away there. The strategy focuses on trading at these edges rather than in the middle of low-volume zones, which are unpredictable and treated as no-trade areas.
What are the four key daily levels?
The four key contextual liquidity levels are the overnight high, the overnight low, the prior day high, and the prior day low. These are zones where trapped traders are likely to act aggressively when price returns. A trade setup is strongest when a volume edge lines up with one of these four levels, which adds context to the reaction and improves the probability of the move.
What confirms a trade and how do you set entry, stop, and target?
Three elements must be present: price touching a volume profile edge, alignment with a key level like the overnight or prior day high or low, and a high-volume signal candle with a visible wick rejecting the area and closing in your direction. You always wait for that candle to close. Entry is on the close, the stop sits just beyond the signal candle's wick or the edge of the high-value node, and the target is the next shelf, trading edge-to-edge through the low-volume zone. Directional bias comes from the higher timeframes, and the prior day point of control retest is a core setup.
Can I backtest the Volume Profile Strategy?
Yes. You can test this strategy using TradeZella's backtesting with 11+ years of historical data. Set bias from the weekly and daily profiles, mark your high-value and low-value areas and the four key levels, replay the 4-hour and 1-hour charts, and wait for a volume edge plus a high-volume signal candle before entering, targeting the next shelf. Every trade logs automatically with entry, exit, position size, and P&L, and you can tag edge rejections and prior day POC retests separately. After 30 to 50 trades you can see your win rate, profit factor, and expectancy before risking real money.
What is TradeZella backtesting?
TradeZella backtesting lets you test a trading strategy against 11+ years of historical market data across forex, futures, stocks, and crypto, down to seconds-level timeframes. You can do it two ways. Replay the market bar by bar and place trades as if you were trading live, with your own timeframes, automatic position sizing, and stops and targets you drag right on the chart, and every trade logs automatically with entry, exit, size, and P&L. Or use automated no-code backtesting: define your strategy rules in plain English and the engine runs them across years of data in seconds, returning every individual trade it took with the exact setup drawn on the chart, so you see why each trade fired instead of just an equity curve. Zella AI then analyzes the results and flags what to fix.